Quantcast
Channel: Diego Quijano Scaleworks
Viewing all 69 articles
Browse latest View live

Going armoured...Jagdpanther Late Version 1/48

$
0
0
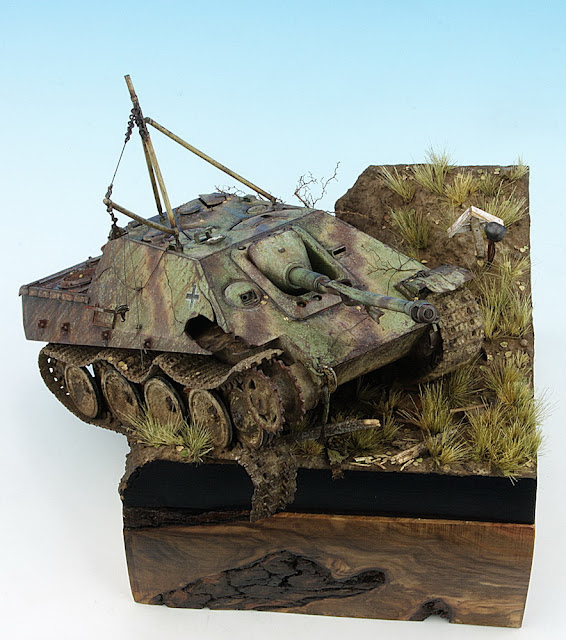
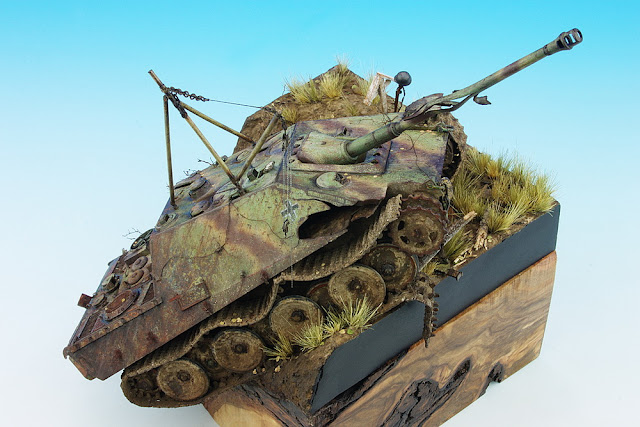
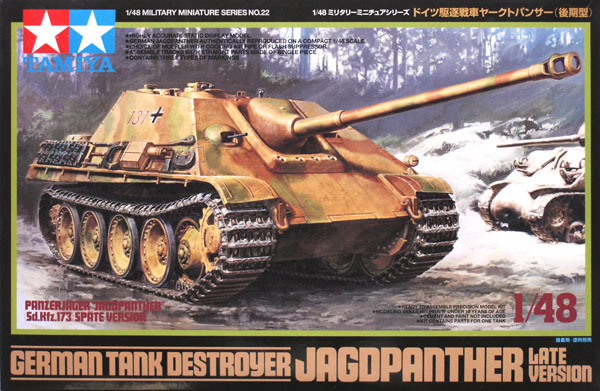
The kit is Tamiya´s 1/48 Jagdpanther Late Version. I wanted to make some transformation so I chose an even later version than the kit´s options. The Achtung Panzer #4 book has really nice drawings with the differences of the Jagdpanther variants depending on the fabrication date. It was really helpful.
La maqueta es elJagdpanther Late Version 1/48 de Tamiya. Quería hacerle alguna transformación así que elegí una versión de producción un poco más moderna que la del kit. El libro Achtung Panzer nº4 tiene unos esquemas estupendos con las diferentes variantes de JP dependiendo de la fecha de fabricación. Es un libro muy útil:

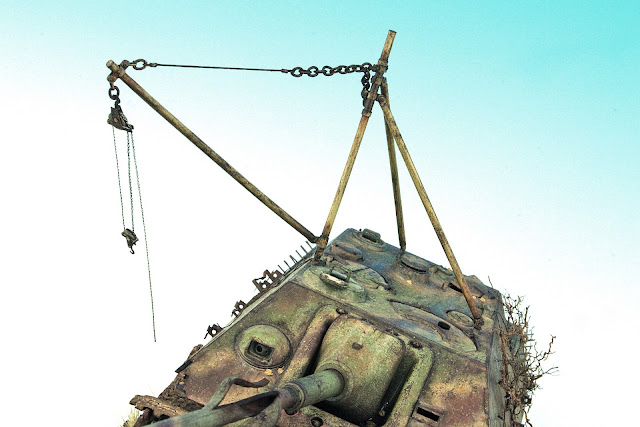
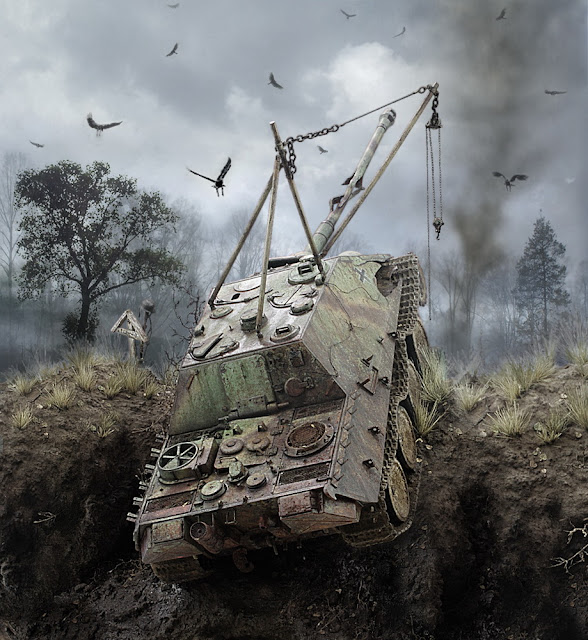
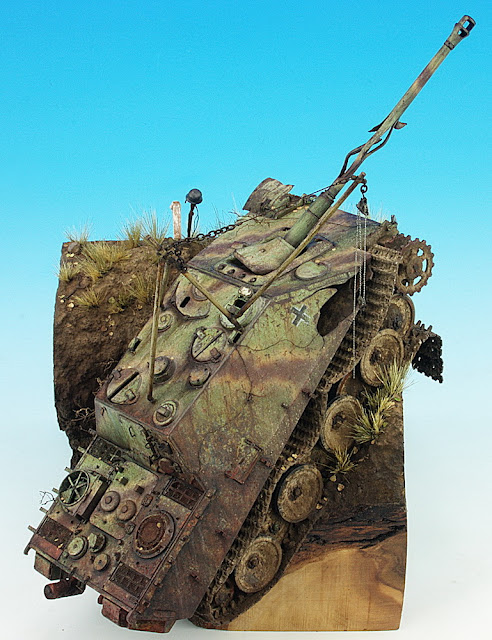
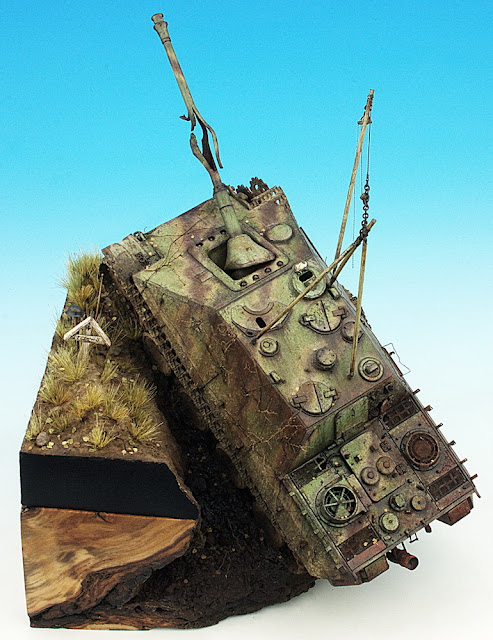
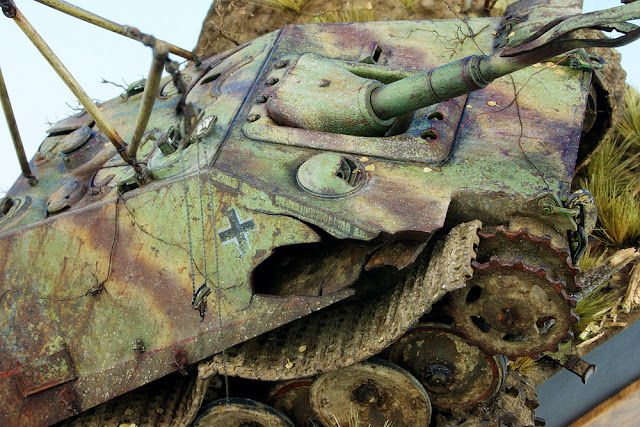
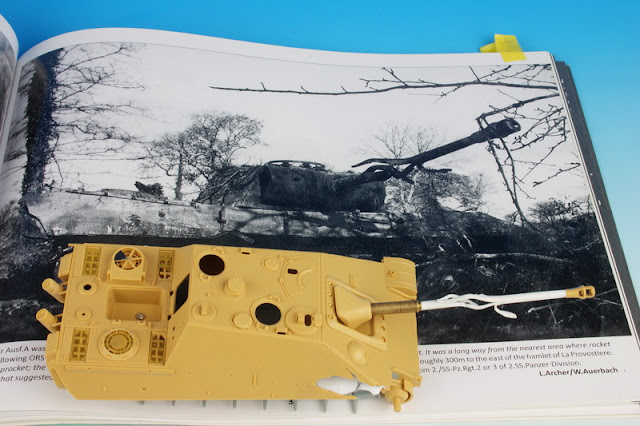
Another transformation I wanted to do was some combat damage but not the much seen round impacts. In the Panzerwrecks books I found a lot of good ideas for the gun barrel and the hull damage.
Otra transformación que quería hacerle era algunos daños de combate distintos de los muy vistos impactos circulares. En los libros Panzerwrecks encontré buenas ideas para los daños del cañón y el blindaje:


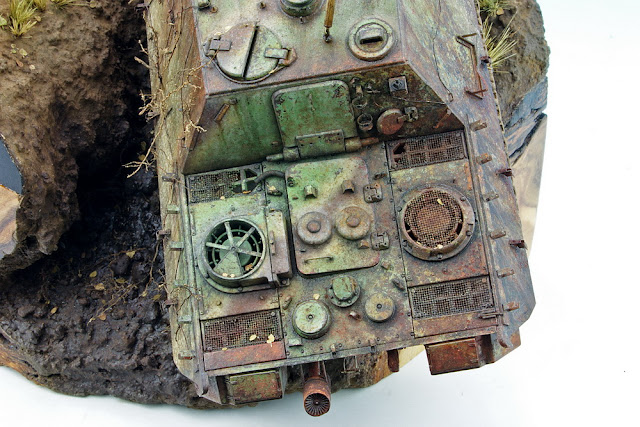
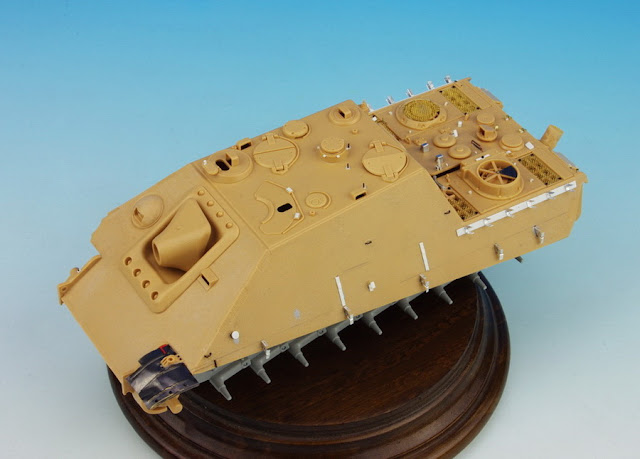
After the assembly I gave some texture to the hull with the "Tamiya cement technique". I used cleaner for PVC pipes instead of Tamiya Thin because is a little stronger and dries faster. And it is cheaper. After that I sanded the surface, of course, with 1000 grain sandpaper or so.
Después de montarlo le di algo de textura al blindaje con la técnica del pegamento Tamiya pero usando limpiador para PVC. Es un poco más fuerte que el Tamiya Thin y seca más deprisa. Y es más barato. Después de dejar algo rugosa la superfecie lijé suavemente con una lija de grano 1000 más o menos:

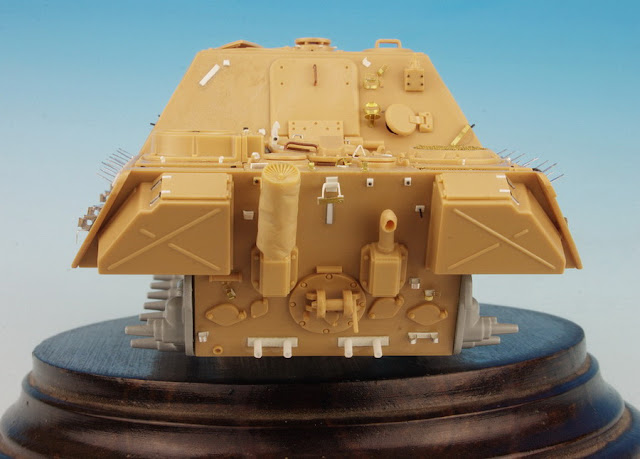
I chose an early 1945 production Jagdpanther so there are some differences with the Tamiya kit. The drawings from Achtung Panzer #4 book were very helpful to make this version. The detailing is made with spare PE pieces, styrene and some copper wire. The usual stuff.
Elegí una versión de producción de principios del 45´así que hay algunas diferencias con la maqueta de Tamiya. Los esquemas del Achtung Panzer #4 fueron muy útiles para hacer la transformación. El detallado está hecho con piezas de estireno, hilo de cobre y algunos fotograbados:


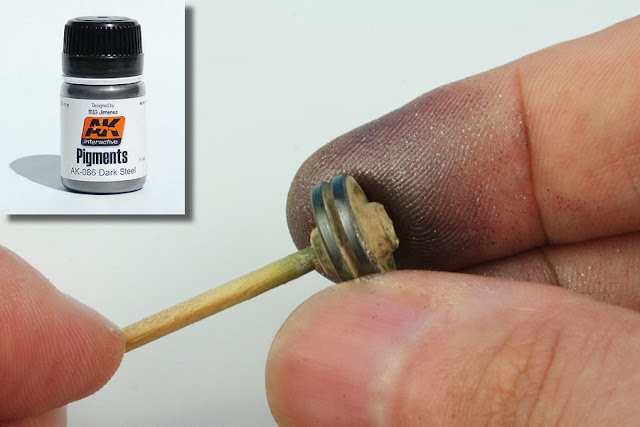
One problem of Tamiya´s kit is the metallic lower hull that don´t allow to move the wheels suspension. An easy trick is to make another hole in some of the middle wheels to locate them a little upward or downward.
Un problema del kit de Tamiya es que la barcaza de metal no permite mover la suspensión. Un truco sencillo es hacer otro agujero en algunas ruedas para poder ponerlas a diferentes alturas:

This way we can get an irregular suspension.
De este modo se pueden poner las ruedas con la suspensión irregular:
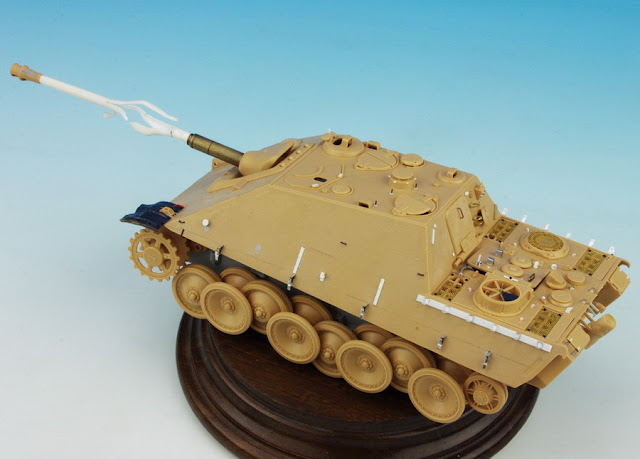
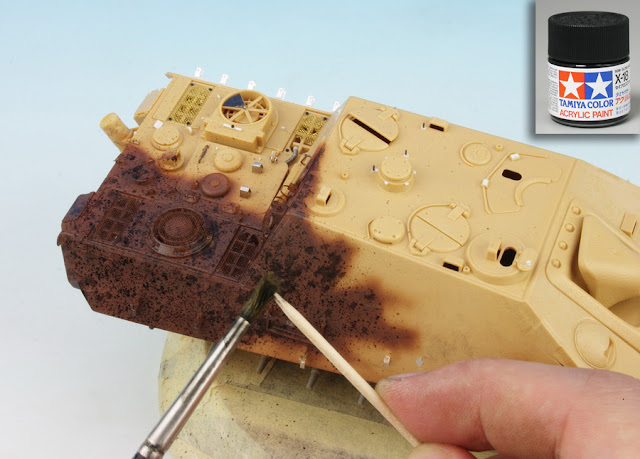
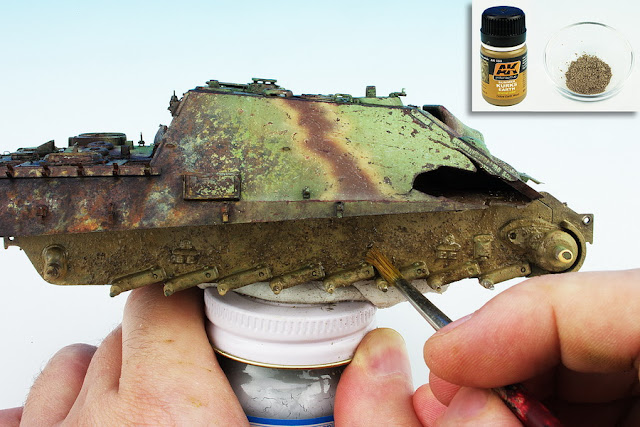
And the Jagd is ready to paint. Next week I´ll try some rusty areas in the rear side before applying the camo.
Y el Jagd está listo para pintar. En el siguiente capítulo pintaré algunas zonas en óxido antes pintar el camuflaje.

Jagdpanther Late Version 1/48 (II)

$
0
0
Finally I decided to imitate a wide rusty area on the rear zone where the paint has been damaged by a fire or something. I also wanted a chipped effect in the transition between the rusty zone and the paint so I used the hairspray technique. 
Finalmente decidí imitar una amplia zona oxidada en la parte trasera donde la pintura ha sido dañada por un incendio parcial o algo así. También quería probar un efecto desconchado en la transición entre la zona oxidada y la pintura así que usé la técnica de la laca.

The base coat is Red Brown mixed with a little of Tamiya´s Clear to get a satin finish.
La capa base es Red Brown mezclado con un poco de Clear de Tamiya para conseguir un acabado satinado:

I wanted a little more of contrast so I splashed Semigloss Black diluted with water.
Para conseguir algo más de contraste hice unas salpicaduras con negro satinado diluido con agua:

The next step was to apply a coat of hairspray. It was a thick layer because I wanted to remove much of the next coat of paint.
El siguiente paso fue aplicar una capa de laca de pelo. Fue una capa gruesa porque quería bastante de la capa de pintura siguiente:

Lifecolor acrylic paint is really nice for this technique. It is not as vinylic as Vallejo´s so the chipping is more natural. I used a yellow greenish mix to imitate the damaged paint. First I applied some patches with brush and then I airbrushed the paint on the transition zone.
Las pinturas acrílicas Lifecolor son estupendas para esta técnica. No son tan vinílicas como los acrílicos de Vallejo así que el descascarillado es más natural. Usé una mezcla amarilla con un toque verdoso para imitar la pintura dañada. Primero pinté algunos parches irregulares a pincel y entonces aerografié la pintura en la zona de transición:

And then we can wet the surface and scratch the paint with a brush. Depending on how much water and which brush you use the chipping will be bigger or smaller. It also depends on how much hairspray you used, but even with such a thick coat as I applied you can control the chipping using a small brush and not much water.
Ya podemos humedecer la superficie y arañar la pintura con un pincel. Dependiendo de cuanta agua y que pincel se use el descascarillado será mayor o menor. También depende del grosor de la capa de laca previa. Pero incluso con una capa de laca tan gruesa como la que apliqué se puede controlar el descascarillado usando un pincel pequeño y no demasiada agua.

Next I used AK´s Light Rust wash to get some orange stains. This enamel stuff is really easy to use.
A continuación usé un lavado Light Rust de AK para hacer algunas manchas de óxido anaranjado:   

The look so far is too much mottled for my taste. Still needs some washes and pigment to unify the effect. But first I want to paint the camo and then weather the whole model.
So, next time: the camo painting.
De momento la apariencia es demasiado moteada. Todavía necesita algunos lavados y pigmentos para unificar el efecto. Pero primero hay que pintar el camuflaje, en el siguiente capítulo.


GUEST GALLERY: F7U-3 Cutlass 1/72 by RICARDO RODRIGUEZ.

$
0
0
"The final result cannot be called realistic, but I would not define it as fantasy either, but perhaps conceptual. I have mixed parts of different Cutlass into one, in several states that would not coexist in practice. The paintwork reproduces a complete restoration of the aircraft from one end to another. This allowed me to explore all the possibilities of the metallic finish over one single subject, and to appreciate all the variations. In fact the contrast is so high between both fuselage sides that I might actually describe it as two models in one. All these strong contrasts and the huge variety of effects and parts finally meant that the end result satisfied me much more that my original idea." -Ricardo Rodriguez.

Another masterpiece I love, again from Ricardo Rodriguez. This Cutlass, aside from the great paintjob and detailing skills, is a model full of interesting and original details. In first place I love two faced models, showing different things on both sides. Here you can see a degraded plane with opened panels on one side and a newly painted plane on the other. I also love all those interesting details as the detailed opened panels, the primer painted zones, the degraded paint, the weathering effects and the markings masking (a master touch). In short, a model that can be watched for hours.

Q


Jagdpanther Late Version 1/48 (III)

$
0
0
It is time for painting the camo. I want to get a worn look on the hull so I decided to use the hairspray technique again to chip the camouflage paint. The first step is to apply the red hull colour that will be the colour of the chipping. I used again Red Brown mixed with a little of black and X-22 Clear to get a satin finish.
Hora de pintar el camuflaje. Como quería una apariencia bastante gastada  decidí usar la técnica de la laca de nuevo para descascarillar la pintura del camuflaje. El primer paso es aplicar el color de las zonas descascarilladas, es decir, el marrón rojizo. Usé una mezcla de Red Brown con un poco de negro y X-22 para darle un acabado satinado: 

Then I applied the hairspray coat, not as thick as the one used for the previous oxide effect because I wanted a smaller chipping.
A continuación se aplica la capa de laca. No tan gruesa como la capa usada anteriormente porque ahora busco desconchones más pequeños:

Lifecolor paint is easier to chip than Tamiya or Gunze so I applied a layer with Lifecolor before painting the camo with Gunze Hobbycolor. I used the remaining paint mixed for the previous phase.
La pintura acrílica Lifecolor es más fácil de descascarillar con esta técnica que la de Tamiya o Gunze así que apliqué una capa de Lifecolor antes de pintar el camuflaje con Gunze. Usé la mezcla que había sobrado de la fase anterior:

For the base green colour I used Hobbycolor RLM82 Light green. To get some modulation effect I mixed it with white to light some areas and with black to darken others. Masking tape and post-it sheets are useful to mark some edges.
Para el verde base usé el Hobbycolor RLM82 Light green de Gunze. Para hacer algo de efecto modulado añadí un poco de blanco para aclarar ciertas areas y un poco de negro para oscurecer otras. La cinta de enmascar y los post-it son bastante útiles para marcar las aristas:

Then I highlighted the raising elements with a light green mix of Lifecolor paint.
Luego se resaltan algunos elementos en relieve con una mezcla verde claro de Lifecolor a pincel:

A view of the modulation effect before the chipping.
Vista del efecto modulado antes del desconchado:

I used three tools for the chipping, an old hard-hair brush for chipping big areas, a smaller brush for more controlled chipping and a toothpick to get some scratch-looking chipping. You must wait some seconds after wetting the surface with water so the hairspray dilutes and the paint chips easily.
Usé tres herramientas para este desconchado, un pincel viejo de pelo rígido  para los desconchones de mayor tamaño, un pincel más pequeño para desconchones mas controlados y un palillo para imitar arañazos y desconchones alargados. Hay que esperar algunos segundos después de humedecer la superficie con agua para que la capa de laca se diluya y la pintura se desconche facilmente:

The camo stripes were painted with Tamiya colours Red brown and Dark yellow.
I also wanted to chip the brown and yellow colours so the green paint could be visible underneath, therefore I sprayed another layer of hairspray over the green coat before applying the stripes. But for some reason it didn´t work this time, either the hairspray layer was too thin or Tamiya paint is too hard for chipping (or I let it dry too longer).
Las bandas del camuflaje están pintadas con colores Tamiya, Red brown y Dark yellow.
También quería descascarillar estos colores para que se viera algo de verde por debajo así que aerografié otra capa de laca sobre el verde antes de pintar estas franjas. Por alguna razón la cosa no funcionó. O la capa de laca era demasiado delgada o la pintura Tamiya agarró demasiado fuerte (o la dejé secar demasiado tiempo):

The chipping on the stripes was done the same way, with water, brushes and toothpicks. I also used a puncher on the wet paint to make some sharp scratches.
El desconchado de las franjas marrones y amarillas se hace de la misma forma, con agua, pinceles de pelo corto y rígido, y palillos. También usé un punzón sobre la pintura humeda para hacer algunos arañazos finos. Como ya he dicho, no conseguí que se viera el verde por debajo de las franjas, el descascarillado llegó directamente al marrón oscuro:

That´s all for now. In the next chapter I´ll begin with the weathering, the funny thing.
Y esto es todo de momento, en el siguiente capítulo empezaremos con el ensuciado, la parte divertida.

GUEST GALLERY: Spitfire MK.IXc 1/32 by JUAN VILLEGAS.

$
0
0
Juan Villegas is one of those crazy Spaniards whose works I love. His attention to detail, especially in the weathering is exquisite. Many 1/32 models we see are painted exactly with the same detail level as if they were 1/48 or even 1/72. Not Juan Villegas´ pieces. He harnesses this scale using a wide range of effects that add the enough complexity to look not only realistic but completely astonishing. Please don´t miss the close up images.
This Spitfire is one of those works that must be quietly watched with a cup of your favourite drink. You will learn some things for sure. I did it.
To see the complete building thread follow this link, only in Spanish but plenty of pictures:
Juan Villegas´ Spitfire

Q


Jagdpanther Late Version 1/48 (IV)

$
0
0
After painting the camo and making the main chipping with the hairspray technique, I made some more fine chips and scratches with a 0.5 dark brown marker.
Después  de pintar el camuflaje y hacer la fase principal de descascarillados con la técnica de la laca, usé un rotulador fino marrón oscuro para hacer otros desconchones y arañazos más finos: 

Next I splashed a light sand color (AK´s Africa Korps filter) trying to make very small spatters. This is a nice way to add complexity to the surface.
A continuación hice algunas salpicaduras con un color arena claro (filtro Africa Korps de AK) intentando conseguir un moteado fino. Es un buen método para añadir complejidad a la superficie:

The spatters can be easily blurred or eliminated rubbing with a brush.
Las salpicaduras pueden ser difuminadas o eliminadas facilmente frotando con un pincel:

In order to mark the line of the removed fenders I airbrushed Tamiya Buff just above the line. This imitates the dust accumulation when the fenders were in place:
Para marcar la línea de los faldones laterales aerografié con Buff de Tamiya por encima de la línea para imitar la acumulación de polvo cuando los faldones estaban en su sitio:

Then I darkened the zone under the fenders with a dark brown wash. I also made some scratches with light gray and ochre pencils.
Después oscurecí la zona bajo los faldones con un lavado marrón oscuro. Luego añadí unos arañazos con lápices gris claro y ocre en los laterales y frontal del carro:

With a mix of acrylic Burnt umber and black I drybrushed the dark borders of the modulation to enhance it a little more and to enhance the weathered look.
Con un color marrón oscuro (Burnt umber y negro) apliqué pincel seco sobre la zona oscura del efecto de modulación para resaltarlo un poco más y darle un aspecto desgastado: 

The next step is to profile the lines and raised elements with a wash of diluted black oil paint. I´ve seen some cool models with the German three-tone camo and a very dark profiling. I really like that look, so I did it that way. Anyway, the dust will blend everything.
El siguiente paso es perfilar las líneas y elementos en relieve con un lavado de óleo negro diluido. Me gusta mucho el camufalje aleman en tres tonos con el perfilado muy oscuro que he visto en algunas estupendas maquetas y quería buscar algo parecido. También hay que tener en cuenta que los efectos de suciedad posteriores disimularán el efecto: 

I also used the black oil to shadow some zones, especially on the lower border of the raised elements.
También usé el óleo negro para sombrear algunas zonas, especialmente en la parte inferior de los elementos en relieve:

Of course the black oil wash can also be blurred rubbing with a brush.
Por supuesto, el óleo negro también puede ser difuminado frotando con pinceles:

There is still a lot of weathering to be done on the hull but I want to paint and weather the wheels and tracks before that. So, in the next chapter there will be mud. A lot.
Todavía queda mucha suciedad que añadir pero primero quiero pintar y añadir barro a las ruedas y orugas. Así que en el siguiente capitulo habrá barro. Un montón.

Jagdpanther Late Version 1/48 (V)

$
0
0
To imitate the mud of the lower hull first I applied a wash with a sand ochre colour (Kursk Earth).  Next I wet the surface with Pigment fixer and applied European Earth pigment over it quite randomly.
Para imitar el barro de la zona inferior primero apliqué un lavado con un color arena ocre (Kursk Earth). Una vez seco se humedece la superficie con Fijador de pigmento y se aplica pigmento European Earth de forma aleatoria.

When the mud coat was dry I applied some spots of Engine Oil mix to get some wet mud zones. The glossy finish of the Engine Oil mixed with the dry pigment makes a nice wet mud effect. It also works with AK´s Fuel Stains.
Cuando la capa de barro haya secado se pueden aplicar manchas de Engine Oil para imitar zonas de barro húmedo. El acabado brillante de este producto mezclado con el pigmento seco produce un estupendo efecto de barro húmedo. También se puede usar el Fuel Stains de AK:

The first step to paint the wheels is to paint black the rubber band.
El primer paso para pintar las ruedas es pintar la banda de goma negra: 

I used Quick Wheel´s masking sheet for Tamiya´s Panther to paint the green zone. Very easy.
Usé la lámina de enmascarar de Quick Wheel para el Pantera. Con esta plantilla es muy fácil y rápido pintar la zona interior:
 
Quick wheel´s masking fits great and the rubber band is perfectly profiled. This is a great tool if you don´t want to weather the wheels too much (which is what I finally did).
La plantilla de Quick Wheel encaja muy bien y la banda de goma queda perfectamente perfilada. Es una herramienta muy util si no vais a embarrar completamente las ruedas (que es lo que hice al final):
 
Because if you like the mud there will be little of green visible. On the internal side of the wheels I applied a quick weathering with a wash of Kursk Earth and then someEuropean Earth pigment.
Porque si os gusta el barro, al final habrá poco verde visible. En la parte interna de las ruedas hice un embarrado rápido con un lavado con Kursk  Earth y luego pigmento European Earth:

On the external side of the wheels I applied Pigment fixer and European Earth pigment right over the green base.
En el lado externo de las ruedas apliqué Fijador de pigmentos y pigmento European Earth directamente sobre la base verde:
 
A nice way to imitate the polished steel band of the idler wheel is to use graphite powder or Dark Steel pigment.
Una buena forma de imitar la banda de acero pulido de la rueda tensora es usar grafito en polvo o pigmento Dark Steel:
 
With the wheels glued in place I splashed a dark brown wash (Track Wash) spraying air with the airbrush. Then I retouched the spots with a brush.
Con las ruedas pegadas en su sitio hice unas salpicaduras con un lavado marrón (Track wash) con la ayuda del aire del aerógrafo. Luego retoqué las salpicaduras con un pincel:
 
The tracks were painted with a Red hull base coat. Then I made a mud mix with plaster, Pigment fixer, Kursk Earth and European Earth pigment.  With this mix you get a nice texture. Then I splashed Track Wash the same way as I did in the wheels.
Las cadenas tienen una capa base de Red hull de Tamiya. Luego hice una mezcla de barro con escayola, Fijador de pigmento, lavado Kursk Earth y pigmento European Earth. Con esta mezcla se consigue una buena textura de barro. Una vez seco salpiqué con Track Wash igual que hice con las ruedas:

In the next chapter I´ll finish the weathering (I hope so).
En el siguiente capítulo terminaré el ensuciado del carro (eso espero).

GUEST GALLERY: Hansa Brandenburg W.29 1/32 by DANIEL ZAMARBIDE.

$
0
0
This time I present you one of the pieces of Daniel Zamarbide. Dani Z also lives in Canary Islands so we are almost neighbours. He is one of the most prolific modellers I know with this level of artistry. Not an easy thing to build a masterpiece in a few weeks, but it´s obviously possible, he can.
This is 1/32 Wingnut Wings´ Hansa Brandenburg W.29. I don´t specially care about WWI planes not even hydroplanes of any age, and I specially hate the German lozenge camouflage. Nevertheless this is a nice example that mixing three nasty things sometimes can produce a wonderful creation. I love the pastel shades of the model and the combination with the realistic wooden pieces and the superb detailing of engine and cockpits. Dani has even managed to make me love this lozenge scheme!
Watching this wonder makes me wish to build a WWI hydroplane with lozenge camo. That´s a great compliment, believe me.
You can watch more of Daniel Zamarbide´s works in his blog: DZModels   

Q


The "Sandtrooper" work: Kotobukiya 1/6 aprox.

$
0
0
“Let me see your identification” –Favourite phrase of the Sandtroopers along the Galaxy-

Who doesn´t like those beautiful Star Wars statues by Kotobukiya?  They are nicely sculpted...by not so nicely pre-painted in some cases.  That´s what happens with the weathering of the Sandtroopers. It is really ugly. So I decided to repaint it.
Other problem with these figures is the mould lines. If you want to treat the figure as a scale model you must eliminate those nasty lines. No discussion.   
My first intention was to repaint and weather it but after painting the white coat and the shading the angles it looked so good to me that I left it just that way, no weathering at all. He has just got off the shuttle.
To fully repaint these figures it is not affordable if you have dozens of them but they are so wonderfully sculpted that I think it worth the effort to improve some of them.

Diego Quijano.

(Click on the photos to enlarge, they look better)


Jagdpanther Late Version 1/48 (VI)

$
0
0
The tank is going to be quite sloped inside a hole (artillery crater or something) in this mini wooden base. The right track is broken due to battle damage; I used some Friulmodelismo spare tracks from a Panther to make the hinged upper section (still not in the definitive position).
El tanque va a ir bastante inclinado dentro de un hoyo (un crater de artillería o algo así) sobre una pequeña base de madera. La oruga derecha está partida debido a a los daños del combate, usé las orugas del kit excepto para hacer la sección doblada del lado derecho que son unos eslabones articulados de Friulmodelismo sobrantes de otro Pantera (todavía no están en la posición definitiva):

I applied some rust in the areas without mud (the drive sprocket teeth and the inner wheels ring). These zones are polished due to metal friction so they get rusty with the time. I used Rust Streaks enamel and Light rust pigment.
En las zonas de las ruedas sin barro (los dientes de la rueda tractora y los anillos de las ruedas interiores donde rozan los dientes de la cadena) se puede añadir algo de óxido. Para elló usé Rust Streaks de AK y pigmento Light rust:

I continued the hull weathering with some irregular rainmarks, is very easy with AK´s Rainmarks mix. First you draw the lines then you blend them with a brush slightly wet in White spirit. The roof have some dark streaks in the rear side of the raised elements made with Winter Streaking Grime enamel product.
Ya podemos continuar con el ensuciado del blindaje, ahora unas marcas de lluvia verticales ( usé Rainmarks de AK). Es muy fácil de hacer, primero se dibujan unas líneas verticales (a mi me gusta que queden irregulares) y luego se difuminan con un pincel ligeramente humedecido en White spirit. El techo tiene algunos chorretones oscuros en la parte trasera de los relieves, están hechos con Winter Streaking Grime:

Next I added a few rust streaks from the chipping also following the old vertical (before the tank got sloped). These two effects (the previous rainmarks and the rust streaks) are the weathering before the tank was damaged and abandoned so they must not be much evident, better if they are a little faded. Very easy to paint with Rust Streaks enamel.
A continucación añadí chorretones de óxido que parten de algunos desconchones también siguiendo la vieja vertical ( antes de que el tanque quedara inclinado). Estos dos efectos (las marcas de lluvia anteriores y estos chorretones de óxido) representan los efectos antes de que el tanque fuera dañado y abandonado así que no deben ser muy evidentes, mejor si quedan sutiles. Los chorretones se dibujan sin problemas con Rust Streaks:

Then is time for the sloped effects, the weathering after the tank was abandoned. I used Rust streaks and NATO rainmarks enamels to make some streaks a little more visible than previous. I mixed some wide streaks with narrower ones.
Ahora es el momento de los efectos inclinados, el desgaste sufrido después de que el carro fuera abandonado. Usé de nuevo Rainmarks y Rust Streaks para hacer chorretones pero esta vez de forma más visible. Mezclé chorretones pequeños con algunas marcas de escurrido más grandes:

Then I splashed some mud on the lower hull with the same mix used to make the mud of the tracks (plaster, Pigment fixer, Kursk Earth and European Earth pigment) plus a little of water to get a more liquid mix.
A continuación hice unas salpicaduras de barro en la parte inferior de la barcaza con la misma mezcla usada para imitar el barro de las cadenas (escayola, Fijador de Pigmentos, Kursk Earth, y pigmento European Earth) más un  poco de agua para hacer más líquida la mezcla y poder hacer las salpicaduras sin problema:

I also added some mud splashes on the lower hull sides and used a short hair brush to move downward some splashes and so create a rain-mark effect. Finally I added new small rust streaks from the chipping following the new vertical. I want to add some oil spots and wet effects here and there but first I want to finish the base scene.
También añadí algunas salpicaduras de barro seco en la parte inferior de los laterales, una vez secas usé un pincel de pelo corto para frotar hacia abajo algunas salpicaduras y así crear un efecto de escurrido. Finalmente añadí algunos pequeños chorretones de óxido siguiendo la nueva vertical. Faltan por añadir algunas manchas de aceite y efectos húmedos aquí y allá pero primero hay que terminar la base:

So in the next chapter... the scene job.
Así que en el siguiente capítulo...la base ambientada.


GUEST GALLERY: Heinkel 219 "UHU" 1/48 by RICARDO ABAD "CHICHO".

$
0
0
Now I want to share with you this awesome piece by Chicho Abad. Chicho used the Tamiya kit to build an incredible super detailed “Uhu” under restoration inspired in the one in display in the Air and Space Museum, Washington. He shows us a Heinkel 219 with the central fuselage in advanced restoration but the wings still with the German camouflage, which gives a nice visual contrast. I love all the opened panels, of course, but I specially enjoy the asymmetric detailing on the engine nacelles. Chicho used the two engines to show different things in each one, and this way duplicating the interest.
This is a wonderful work full of amazing details, no doubt.

Q


The "Flying Hisso" work: Wingnut Wings 1/32.

$
0
0
The kit from Wingnut Wings has a nice detail and fitting in general but with some problems in the engine cover. I also used True Details´ McCudden SE.5a Conversion set. True Details´ resin piece for the cockpit cover also needs some work for a correct assembly. Anyway, the result worth the effort.
I applied some light effects with pre and post-shading to enhance the contrast. The weathering is made with enamel products. For the rigging I used the black elastic wire that Wingnut sells in its page.
I tried to get a vintage look with the painting, I don't know if I succeeded but I think it looks nice enough.

Diego Quijano.


GUEST GALLERY: Venator-class Republic Star Destroyer 1/2274 by THE MADHATTER.

$
0
0
The Venator-class Star Destroyer, was one of the capital ships used extensively by the Galactic Republic during the later parts of the Clone Wars, as well as by the Galactic Empire. It was designed and constructed by Kuat Drive Yards and Allanteen Six shipyards. ―Wookieepedia.

This is the most detailed SW model I´ve ever seen. And it is not only amazingly detailed and painted but also insanely illuminated! A real gift for the eyes of every Star Wars fan.
The Madhatter is an Aussie modeller from Melbourne. He used the basic Revell´s kit and turned it into a "massive" starship in miniature. As you can see the force is strong with him that´s why I consider him one of those few Jedi Modellers around the Galaxy.
You can read Madhatter´s WIP thread of the Venator Destroyer here.

Q


Jagdpanther Late Version 1/48 (VII)

$
0
0
Before the final weathering I want to finish the small base so the mud and weathering in the model matches with the scene. It´s not a diorama, not even a vignette, just a small scene to put the model in context. The ground is modelled with Das Pronto putty. After that I covered the surface with a mix of natural earth, plaster and acrylic resin plus a little of water (just enough to get a muddy texture).
Antes de los toques finales en el carro hay que hacer la base ambientada para que el barro y el ensuciado de la maqueta coincidan con los tonos de la base. No es un diorama, ni siquiera una viñeta, solo una pequeña escena para poner la maqueta en contexto. En primer lugar se modela el terreno básico con masilla Das Pronto. Después cubrí la superficie con una mezcla de tierra natural, escayola, pasta de relieve y un poco de agua (justo la suficiente para que quede una textura de barro):

I also added some pigments to change the color, Dark earth and European earth. You can also add small stones to the mix to add some texture.
También añadí algo de pigmento Dark Earth y European Earth para cambiar el color. Tambien se pueden añadir piedrecitas a la mezcla para añadir textura:

Once the mix has dried you can get the contrast you want with the application of pigments and Pigment fixer until the ground color matches with the mud of the model. I used Track wash to dark the wet areas. The fresh mud of the lower zone is imitated with dark brown pigment mixed with Wet effects.
Una vez que la mezcla esté seca se pueden conseguir los matices y contrastes que se quiera con la aplicación de pigmentos y Fijador de pigmentos, hay que hacer coincidir el color del terreno con el del barro de la maqueta. Después usé Track Wash para oscurecer las zonas húmedas. El barro fresco de la zona inferior se imita con pigmento marrón oscuro mezclado con Wet Effects:

The base is very sloped so is important to get a nice contrast between the lower and upper zones. A good way to get that is imitating a wet ground after the rain, with the upper zones almost dry and the lower zone still with fresh mud. This way, I used dry pigments fixed with Pigment fixer to imitate the dry zone; Track wash to dark the transition with the wet zone; and a mix of Wet effects and dark brown pigment in the lower wet mud zone. I also applied Engine oil to add some contrast to the fresh mud.
La base es bastante inclinada así que es importante conseguir un buen contraste entre la zona inferior y la superior. Una buena forma de hacerlo es imitar un terreno húmedo después de la lluvia, con las zonas superiores casi secas y la zona inferior aún con barro fresco. En resumen, para imitar la zona seca usé pigmento en seco fijado con el Fijador de pigmentos; para humedecer la zona de transición al barro fresco usé Track Wash; y para imitar el barro fresco usé una mezcla de pigmento marrón oscuro y Wet Effects. Para terminar también usé Engine Oil para añadir contraste a la zona de barro fresco:  

Once the earth color is of our taste we can imitate the small bushes with natural fibers. I mixed three colours of Woodland Scenic stuff to get some variety.  Each clump is glued with acrylic resin mixed with brown paint.
Una vez que el color del terreno este a nuestro gusto podemos añadir pequeños arbustos hechos con fibras naturales. Yo mezclé tres colores diferentes para conseguir cierta variedad. Cada matojo se pega con un poco de cola blanca mezclada con pintura marrón.

We plant each bush in place pushing softly.
Luego se planta cada matojo en su sitio presionando ligeramente:

We must incline the external fibers with a toothpick while the acrylic resin is still fresh so the bushes don´t look too vertical.
Hay que inclinar las fibras exteriores con un palillo mientras la cola está aún fresca para que los matojos no queden demasiado verticales:

Finally I pruned some bushes to get a more natural look.
Finalmente podé algunos matojos para darles una apariencia más natural:

Other interesting element we may add is some small leaves, Plus model has a nice variety for 1/48 and 1/35. As the earth is too much porous due to the pigment layers, the best way to glue them is with small applications of acrylic resin. Quite boring but I think it is worth the time. After that you can change the colour of some leaves with diluted paint.
Otro elemento interesante que se puede añadir son pequeñas hojitas, Plus Model tiene una buena variedad para 1/48 y 1/35. Como el terreno quedó muy poroso debido a las capas de pigmento el mejor modo de pegarlas es una a una con pequeñas aplicaciones de cola blanca. Bastante aburrido pero creo que merece la pena. Después se puede cambiar el color a algunas hojas con pintura acrílica diluida:

The thing is almost done, only needs a couple of effects on the tank and adding the final elements. So, only one chapter to go!
La cosa ya casi está, solo necesita un par de efectos más en el carro y añadir los elementos finales. Así que, ¡solo queda un capítulo!


GUEST GALLERY: "The Steel Beast" 1/35 by RICARDO RODRIGUEZ.

$
0
0
This time I would like to show you the 1/35 tank from the film Indiana Jones and the Last Crusade made by Ricardo Rodríguez. If you have had a look to the Guest Gallery you already know of his skill. This is a 100% scratch job made from styrene sheet and a number of different materials. The tank from the movie was built by George Gibbs based in the design of the "International/Liberty" Mark VIII tank.
It´s a wonderful model full of awesome details and even more, it reminds me my favourite Indy movie. I hope you also enjoy it.

Q


Jagdpanther Late Version 1/48 (VIII, Final)

$
0
0
The next step was to add some wires for the branch camouflage. I used the Metal burnishing solution to dark the wire (I don´t know which exact metal the wire was, nickel, tin or something). I also used some paint to add rusty touches here and there.
El siguiente paso fue añadir los alambres que se usaban para sujetar el camuflaje de campaña a base de ramas. Usé el producto Metal Burnishing para oscurecer el alambre. También añadí toques de óxido aquí y allá con pintura acrílica y un pincel fino. 

The final effect on the Jagd paint was some wet streaks from the zones where the water would be accumulated after the rain.
El efecto final en la pintura del carro fueron unos chorretones húmedos desde las zonas donde el agua se habría acumulado después de la lluvia:

Next I painted the rest of the elements of the scene. The German cross is made from wood strips. The hammer and the shovel are from a resin set (Hauler, I think). The Mausser rifle and the helmet are from a Tamiya´s plastic set. The jack and wooden block are the ones from the kit with some modifications.
A continuación pinté el resto de elementos de la escena. La cruz alemana está hecha con tiras finas de madera. El martillo y la pala son de un kit de resina (de Hauler, creo). El rifle Mausser y el casco son de un kit de Tamiya. El gato y el bloque de madera son los de la maqueta con algunas modificaciones:

The 2 ton auxiliary jib crane is from Hauler. I detailed a little the pulley zone with styrene pieces.
La grúa auxiliar es de Hauler. La zona de la polea está detallada con piezas de estireno:

And finally I added some dry branches as a vestige of the former camouflage. I only put the branches in one side of the tank so both sides look different.
Y finalmente añadí algunas ramas secas como vestigio del anterior camuflaje. Solo las puse en uno de los laterales para que los dos lados fueran diferentes: 

And that´s all. It has been a funny project ,trying some new products. I would like to thanks AK Interactive for providing the products and Lu Rodriguez for providing the model. Hey, at least I paid for the wooden base. ;) 
Y eso es todo. Ha sido un proyecto divertido probando nuevos productos. Me gustaría agradecer a AK Interactive por aportar los productos y a Luciano Rodríguez por aportar la maqueta. Al menos la peana de madera la pagué yo. ;) 


The "Busted Beast" work: Tamiya 1/48.

$
0
0
Happy New Year everyone!
This is the nice Tamiya 1/48 Jagdpanther Late Version. I added some details to make a little later version than the kit´s choice. The weathering is mainly done with AK products. You can check the build process here: WIP process
Hope 2013 will be a great modelling year for everybody.

Diego Quijano


GUEST GALLERY: Vought F4U1-D Corsair "White 167" 1/48 by MAREK VRZÁK.

$
0
0
This is the plane flown by Lt. Cdr. Roger R. Hedrick from the USS Bunker Hill in February 1945. This stunning model was made by Czech modeller Marek Vrzák. Marek used the Tamiya kit along with Aires detailing set. Both detailing and painting are equally awesome, that´s the firm of an artist.
It took him several years of work to finish this beauty but I´m sure you will all agree with me that it was time extremely well spent.
You may visit Marek´s facebook: Marek Vrzák 


The "Tiny Tiger" work: Revell 1/72.

$
0
0
This small (really small) vignette was inspired by some evocative photos of the Villers-Bocage battle on 13 June 1944, one week after D-Day. I used Revell´s 1/72 Tiger Ausf. E along with Mig productions detail set and Atak zimmerit set, really nice sets both of them.
Ob´s stürmt oder schneit...

The first picture below is a photomanipulation with the model, please don´t use it as documentation. I think that the Photoshop work is obvious but some people have complaint because they have been cheated by some of my former manipulations. Please remember the first rule in Internet: DO NOT BELIEVE ANYTHING!

The finished model photos were shot by Luciano Rodríguez. Thanks Lu.

Diego Quijano


GUEST GALLERY: SBD-3 Dauntless 1/32 by TOMÁS DE LA FUENTE.

$
0
0
Another Navy bird. This time the Trumpeter 1/32 Dauntless by Tomás de la Fuente. Tomás is one of those few modellers with the capacity of making models of any country, age or scale and keep the same realistic touch. I admire his way of weathering with subtle but very attractive effects. Notice how Tomás superbly imitated the degraded paint effect, the exhaust staining or the characteristic chipping of the Navy aircrafts. And the detailing and paintjob of the cockpits is equally amazing.
A wonderful piece, no doubt.

Q


Viewing all 69 articles
Browse latest View live