Quantcast
Channel: Diego Quijano Scaleworks
Viewing all 69 articles
Browse latest View live

The Mig-21 chronicle.

$
0
0
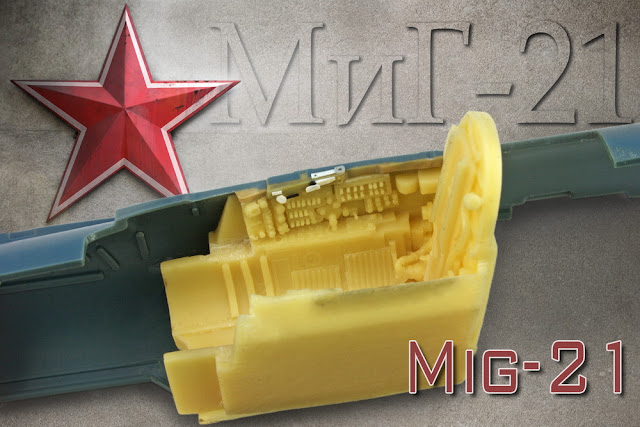
This is the latest fighter that has sneaked into my workbench, Eduard´s 1/48 Mig-21 MF. This aircraft represents the essence of the Cold War Soviet air strategy. A mass production war machine designed to clutter up those ever watching airfields behind the menacing Iron Curtain.
I have chosen a bare metal scheme which best represents my vision of this machine. From the factory right to the battlefield, just enough time to paint the red stars (and plenty of lettering).
The background of the photos is a beautiful digital artwork by Gino Marcomini on Oxygino.com

The Eduard kit is really nice, though I would like a little bigger riveting. Maybe Eduard and Trumpeter should agree a midway position. :)  

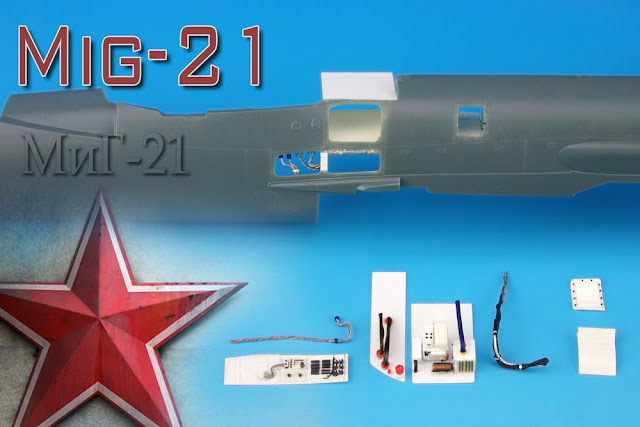
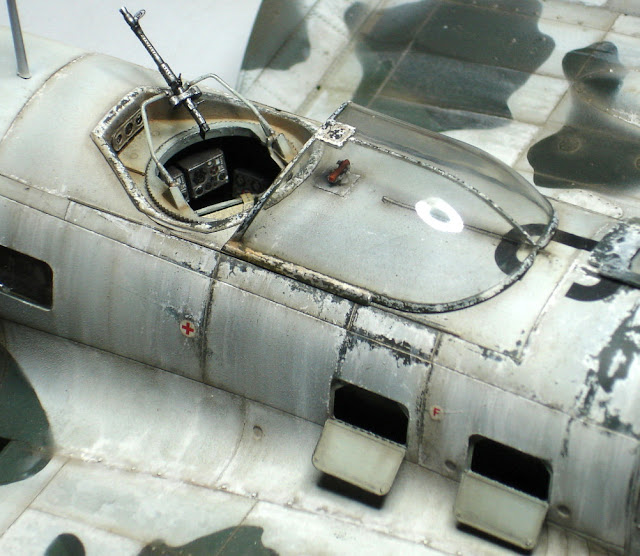
I started with the detailing of the tail panels. Styrene pieces, electrical wire, adhesive tape, stretched sprue...you know, the usual stuff:

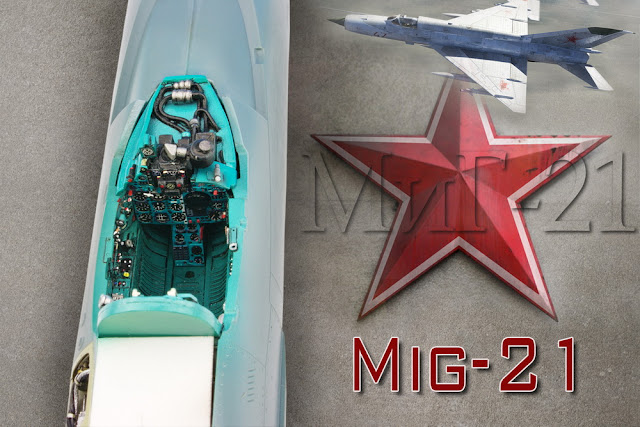
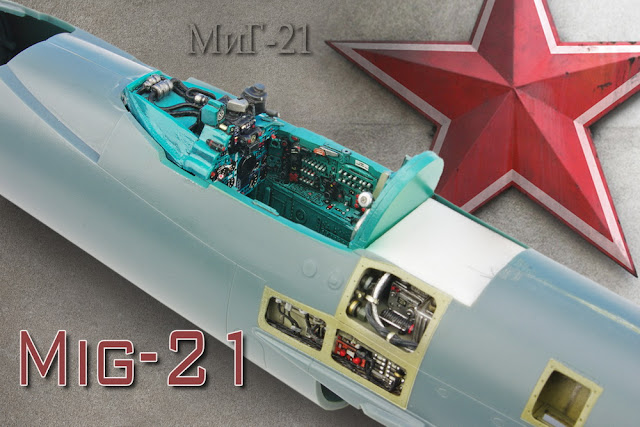
After the painting I attached the remaining elements and wires. The small decals to imitate signs -and some elements too small to be painted- look really nice (in my humble opinion...). Don´t be shy, click the pic to enlarge: 

And that´s all for now. The next step is the detailing of the avionic bays beside the cockpit. Next week.

Q

The Mig-21 chronicle (2).

$
0
0
Some update on this project. These are the avionics bays next to the cockpit. The only difference with the fin panels detailing is that here I had to build not only the avionics but also the bays. It was not difficult anyway.

I used Verlinden´s Lock On Nº21 and Mig-21 in detail by Wings and Wheels Publications to detail this zone. Terrific books both of them. Maybe I will add some unplugged wires hanging down from the panels...but that would be after painting the fuselage. The frames of the panels need some scratches and weathering but that will be later.

Now I´m trying to fit the Aires cockpit for the Academy kit inside this Eduard model, wish me luck.

Q

GUEST GALLERY: Ma.k Maschinen Krieger Jerry 1/35 by MARCEL DU LONG.

$
0
0
Back in Sci-Fi with this wonderful work by Marcel du Long based in Kow Yokoyama´s Ma.K universe. Marcel used the Maschinen Krieger "Jerry" kit from Nito along Tamiya´s Austin Tilly and some figures to make an awesome desert scene. I love the composition and the natural poses of the figures. The combination of colours between the ground, Ma.K, vehicle and figures creates a beautiful contrast and the great attention to detail allows us to discover interesting things wherever we look. In short, a small piece of art.
I should build one of these Ma.K things, I love this stuff!
You can watch more of the amazing art of Marcel du Long in his Website and his Facebook:
Marcel du Long´s Pixels & Plastics
Marcel du Long´s Facebook

Q


Awesome issue of Panzer Aces: Nº41

$
0
0
5 wonderful models...and my ugly Jagd. English or Spanish text. 64 pages of fun, you´re gonna need something to drink!: 
Panzer Aces nº 41 English order.
Panzer Aces nº 41 Spanish order.

Jagdpanther Late heavy weathered with Ak stuff:

Luciano Rodríguez´s impressive JS-2. The thing gets hot, you better have a drink:

 Really original Panther F by Domingo Hernandez:
 
Superb T34-76 by Javier Soler:

 
Jose Luis Lopez explain his B&W technique with this great combo, a Tiger I and a Pz.II. Oops, the beermeter got empty and there is still much fun ahead!

 
And finally, Pat Johnston´s amazing Hetzer. Enjoy!


The Mig-21 chronicle (3).

$
0
0
Cockpit done and fuselage closed! This step has been hard. Not an easy thing to fit an Aires resin inside an Eduard kit, especially if the resin is for the Academy Kit. But there is hardly anything that a motivated modeller cannot fit with files and putty. The McGiver School.

I also used Eduard´s pre-painted photoetched for the control panel and some clocks. To save some effort. :)

I think it looks really nice so far. There are still some wires to be added in the front part before gluing the windshield, along with the HUD screen. 

Now I can add the windshield and canopy, as well as the final avionics panel behind the cockpit (also from Aires). But that´s another story...

Q

GUEST GALLERY: "T-55 Enigma" 1/35 by JOSE LUIS LOPEZ.

$
0
0
This model is a perfect example of the use of painting effects to turn a plastic model into an amazing representation of a real vehicle. Jose Luis Lopez uses the light effects to enhance the volumes of the models, he also apply a wide range of weathering and dirt effects to get an awesome and realistic contrast.
JL is one of those modellers who love to experiment and try new techniques. He uses a black and white pre-painting to check if the effects work well together before applying the colour with transparent layers. As you can see, the result is impressive.
I´ll post soon a guide about Jose Luis Lopez B&W technique. In the meantime you can check other of his works in his facebook: Jose Luis Lopez facebook 

Q


The Mig-21 chronicle (4).

$
0
0
A new update on this project. The avionics compartment behind the cockpit fitted much better than the cockpit, both from Aires. I only added some wires.

The windshield and canopy detailed and painted only in the inner side, so far. I used Eduard photoetched sheet and some scratch pieces.

At this point the model is ready to paint the main landing gear wells and assemble the wings.

Q

The Mig-21 chronicle (5).

$
0
0
Ok, this is the last effort before beggin with the exterior painting. These are Eduard´s brassin wells, they have a really nice detail.

The fitting is perfect. There are still some wires and details that I will add later.

With the wings and fuselage assembled, the model is ready for painting. At last!

Q

The Black&White Technique. Tiger I 1/48 by JOSE LUIS LOPEZ. (I)

$
0
0
Hi everyone, Jose Luis Lopez is one of those innovative modellers I love. In this article he explains with a complete step by step his Black&White painting technique. Whith this technique you can get a perfect and awesome lighting effect and also allows us to check the main painting effects and retouch them before applying the colour with a quite transparent coat. In short, it is like a really advanced pre-shading. JL also used this technique in the 1/35 T-55 Enigma that you can find in the Guest Gallery or clicking here.

Q


PREPARING THE BASE TO WORK.
When you´re painting a kit, all the steps are important. So, I can´t say that these three first steps are the most important. but, for many modellers, the bad results painting with the airbrush starts here.


Picture 1: In this step, you can see Gunze´s Metal primer. I always apply this primer with a brush over the metal surfaces. Gun barrel, PE parts. All metal parts are covered with a thick, really thick coat of this product. This will protect the metal parts from aggressive painting thinners and avoid the paint to peel off.

Picture 2: Once Gunze´s primer is dry, I apply with an airbrush Tamiya´s surface primer. This is the first time I use the white primer and I must say that it´s more difficult to apply than the grey one. Very important: an airbrush is not a brush. You do not have to cover a surface the first time you paint over it. No, no, no, do it in several fine coats, the price is to achieve a nice surface, not finish the first! I´ll insist a lot about this. The airbrush is you friend, he can really make you life easier! Just use it in the correct way. 

Picture 3: One of the most desperate moments for the modeller is when he discovers than the paint over the kit is granulated. People use to hate this, and therefore, the airbrush. There are several variables that help the enemy to granulate your kit surfaces, lack of moisture in the air, too much dust in the environment, bad paint, bad airbrush but even in the worst situation, you have a great ally: a fine sand paper. Use it when necessary over granulated surfaces (be careful with PE parts!), and, very important, the surface must be soft and clean as the skin of a baby! Of course, if you´re making a big tank with rough surfaces no matter, but a smooth surface prior painting is start playing with advantage! 

Now, we have to start preparing our Tiger´s skin. Here starts the challenge. Why this technique? In my case, because I have no a clear idea about colour theory! Most of times, when I want to lighten or darken a colour (dark yellow, for example), the results are anything but harmonics. So, I´ll make the zenithal or modulation effects with a black-grey-white series with no chance of mistake as I just will use black and white colour. Of course, actually you can find a lot of colour sets that makes you life easier (AK Interactive, Lifecolor) and I strongly recommend them. But as I use to customize a lot my base colours and I´m a little bit poor ( :^(), I´ve invented (¿¿??) this technique to achieve similar effects just with black and white paint (and the base colour). Hope you like it!!

Picture 4: General preshading. For me is an important step as I help to start visualizing the final result. I can discover light effects, have a preliminary idea about the weathering and the most attractive parts of the kit (for painting). With this B&W technique not too much of this step will be seen later (just a little bit, enough to keep the future general looking). I used a 90% black 10% mix applied with my airbrush, using Tamiya acrylic paint thinned with Lacquer Thinner. I´ll repeat this hundred times use your airbrush not like a brush. To pass over a surface do not implies the surface is painted. It´ll be painted may be the 6-710 time you pass over it. 


Picture 5: Using first a 80% white and 20% black, I started to paint the general colour of my B&W base, As usually, the paint is heavily thinned as I also want that the preshading work can be seen under this general base colour. Adding each time more white to the mix, I start to play with the modulation and zenithal lights over the vehicle. The last step is made using pure white paint. Yes, I know, some skills with airbrush are required, but this preliminary base is a great choice to start taking confidence with one of your best weapons!. Always remember, an airbrush is not a brush. Always thinned paint, move quickly but with precision (the same precision you use to make incredible PE detailing work!). Always try on a piece of paper before painting your model. A nice base coat, even without any kind of modulation or highlights, always takes 2 or 3 sessions. In the first session, the paint should be barely visible. Do it always little by little. Due to high temperatures here in Madrid and the dry environment, I´ve problems painting. Even with care, sometimes the paint arrives dry to the surfaces but remember, your friend the sandpaper is always there, supporting you! 

Picture 6: Using pure white acrylic paint from Vallejo, with a brush, I just painted some details here and there (clasp, rivets, edges). I played with the number of coats of paint (one is never enough, like with airbrush) so, not all the details have the same white intensity. I always look for very rich bases, with several colour shades. The result by now looks strange, even the pictures seems rare (the white background does not help!), but now we have the perfect base for chipping and weathering!

Picture 7: Now, time for chipping. For many modellers, a real nightmare. Actually, it´s a really difficult step, not only making them in the right shape, but also locating them in the correct an reasonable places. And it´s also a tedious work and frustrating at times And many, many, many times, a good painted kit is spoiled by a bad chipping work. And there´s no second chance with chippings, unfortunately.

And another important factor: How many kits we make in a year? As the average modeller makes 2-3 kits per year, our hands are not always trained to make chipping and scratches. So, when we´re making our chipping work, it was more than 4-5 months the last time we made them. So, we have no habit, no pulse and the first chips are awful? Just when we have been for a pair of hours making chips they start to look nice, just in the moment the work is finished!!. And most times, there are too much chips, or are wrongly situated, or are poorly done. Time to cry. But with this technique, you have two chances, In the first, now, let your hand get warm, do the chips without fear, with confidence, dare to risk with some of them, and, most of all, once you finish this step, stop. Stop. Stop. Look at your kit, investigate it, localize the nice chips, think about the finished tank. And think about keeping the right ones, the places where some are missing, or the places where none is necessary and you´ve already paint several chips. All these are not real problems, as when we paint the base colour we can hide or enhance them at our will.
But, most important once finished this step. Your hand is ready for painting the final chips and you now know where are they wrong and where are nice. You have a second chance later.
I used Vallejo paints for this step, using pure white for some chips and a light grey for the chips located at the darker parts of the Tiger.


Picture 8: General washes all over the tank. I used for this task Panel Line Accent Color from Tamiya, a great product that can be mixed with any of Tamiya´s enamel range and can be thinned with Tamiya´s thinner (blue cap). Previously, I added an generous and thick coat of Tamiya´s clear with my airbrush, a completely necessary base for washes and weathering with this technique.
Also an important step. Here, all the details will become to live, and, something else, a completely no removed wash over a plane surface is a kind of weathering after all!, By now, you´ll probably locate very attractive parts of your kit, which now is far from looking a toy. In 1/48 scale, this step is especially relevant due to the lack of detail of these kits comparing them with their 1/35 counterparts. 


Picture 9: Another view of the Tiger with washes.

Picture 10: Time for weathering. Not a real weathering but a kind of weathering that will help you to create a surface full of contrasts and nice looking for the future base colour. Like on chipping task, you have now the perfect choice to risk and dare with the effects in this step. Start thinking about the finished tank and start looking for attractive weathering and colour effects here and there. And do not do it under pressure, just enjoy playing with your brush. Improve your skills no matter if you fails!
For this task I used Vallejo Glossy Black, which suits perfectly to this task. The procedure is simply. Make a spot, a mark, a dirty surface with the paint slightly thinned with water. Do not worry, do it in a rude or exquisite way, but do it and experiment yourself with the shape of the spots and rain marks or any kind of effect you want. 


Picture 11: Once the glossy black paint is dry (5-10 minutes or even less), with a cotton stick, start removing the paint like if you´re using an pencil, drawing the final shape of the weathering all around the kit. And, once again, you´re working without pressure because if the spots made in the previous step were horrible and without sense, you can erase then partial or completely at your will. You can be extreme painting several dirt spots, and then, calmly, always thinking about the finished tank, erase or modify them to the best way. 

Picture 12: The finished step. And, again, think about the actual result and the way you want to finish the tank. You have time to change, modify and improve anything you want. And, once again (apologizes if I´m repeating too much), work without pressure during these steps, preparing your hands for the following more demanding steps do you feel your hand warm and ready? Great! 

Next step, painting the base color!


Coming soon...

The Black&White Technique. Tiger I 1/48 by JOSE LUIS LOPEZ. (III)

$
0
0

More steps! .... I see the end!!!!!

Washes ... they always help to increase the perception of the details of the kit. 1/48 kits are not as accurate as 1/35 counterparts. And if there were the same quantity of aftermarkets available for the quarter scale, they´d be more difficult to place that in the bigger scale. 1/35 PE sets are a nightmare by them self so, in 1/48, for not very skilled modellers like me, are just a Chimera. So, in my case, I have to hide this with the paint, showing as much as possible the details available in the kit and bring them to life.

Before the washes, I applied a pair of solid coats of Tamiya´s clear, the perfect base for washes as it facilitates the washes to run easily around the kits details.

For this task, as in the previous steps, I used Tamiya Panel Line Accent colour mixed with KX 52 Flat Earth, using Tamiya´s thinner (blue cap) to keep the mix fluid and easy to handle:


Oils: Modeller´s best friend without a doubt! Easy to handle, slow dry, excellent blur just perfect! Using different oil colours, Naples Yellow, Van Dyke Brown, natural umber, blue, white, red . And using the well-know technique of dots I faded the grey colour trying to reduce the contrast of the different shades of the grey and hiding a little bit the chipping aggressive effect of previous steps:


A couple of detail shots of the weathering so far. After this step, I´m ready for the real heavy weathering with dust and dirt:


I used AK Interactive´s enamel Africa dust (AK22) instead Tamiya´s enamel because I felt that the yellowish dust of this product will suit perfectly to the Kitty. If you have not this product, you can also use Tamiya´s enamel paint to do it mixing buff, white and a little bit of desert yellow.

This technique is used by many modellers and the results are really awesome for me. But you must be strong and have faith on your hands, as the intermediate steps of this technique are, how to say this, difficult to assimilate if you have not clear the final look of the tank finished.

I directly airbrushed the product from the bottle without problems:


Now, using AK´s thinner, I started to remove the applied dust to my taste. I just waited 15 minutes and then, using a brush, I cleaned the kit in the desired areas. Even the next day I was able to do this because of the enamel´s nature of the AK´s product. I must say that I´m happy this product, easy to apply and easy to remove with a tasty colour for me. What else?:

Once the base dust colour shapes are OK for me, I applied a nice coat of matt varnish (Marabu) to seal the dust and to avoid any damage from further steps.

Once dry, a pair of days, be patience, I add some dirt details here and there using acrylic paints. I always use the same colours for this: black, dark mud and buff. Mixing them I got a nice dirt colour series. I added a lot of water to the mix to ensure that the desired effects are subtle and if I want a more intense effect, I have just to insist with the brush more times, that ´s all!

So, using these colours, I made different contrast in the dust for a more attractive look. Important thing in this step: The dust on a kit makes it looks, how to say, diffuse, smashed potatoes. Undefined. Excuse me for my lack of English! The dust makes all the details to disappear. So, we have to help the kit with some washes here and there. For me, a kit without depth in the details is a fool! I made the washes using the darkest mixes of the acrylic paint.

So, finally, I think that I managed to return to a highly contrasted Kitty even with dust:


The only remaining effect is the mud, but that will be in the following chapter. I PROMISE that the next part... will be the last!!!!! happy.gifhappy.gifhappy.gif


GUEST GALLERY: "Norway-1943" 1/32 by AITOR AZKUE.

$
0
0
This is the latest piece from Aitor Azkue. If you don´t recall the name you´ll may want to check his "Never Ending History?" here, you most likely remember it.
With this work Aitor bring us a dramatic sight of the most bitter side of aviation. As usual in his latest works the central scene attracts immediately the viewer attention making us to focus in the story. From there we can begin a voyage around the surrounding background just to check the amazing level of detail and realism that enhance the emotion of the message. Aitor is a diorama artist that transcends the mere standards of technical skills in modelling and composition and search a way to touch the spectator. An artist in all the extension of the word (a not enough valued modeller in my opinion, but certainly he will be).
Just a thought about one of my favourite elements, the derelict skiff or, as I like to say, the oblivion boat. Why is it there? Is only an element for filling an empty angle? It has some significance? Well, everyone can make his guess but personally I think it is a sour metaphor about the doom of the crashed bird and maybe of the wounded crewmen as well.
It is hard to be original in the qualification of these kind of works; Aitor always makes me to improve my English vocabulary. What about delightful?
I hope this Norway bitter scene moves you as much as it moved me.

Q  


The inception:


The culmination:


An example of the interior detailing:


Here a few shots with a warmer illumination. As you can see it looks awesome as well: 


The Black&White Technique. Tiger I 1/48 by JOSE LUIS LOPEZ. (IV, Final)

$
0
0

Another daring step where faith is necessary! There´re a lot of ways for simulating mud: with plaster, with acrylic resin and pigments, with specific products so on. All methods are good ways to achieve an attractive result with the mud, depending on modellers taste or affinity with the materials involved. My favourite: Tamiya´s texture paint. Why? A big bottle can mix it with sand, pigments or acrylic paint and, most of all, fix strongly with any kind of surface:

Adding some dark brown pigment and paint to the Tamiya´s paint, I achieve approximately a nice colour to start adding the mud. Anyway, the colour is NOT important. Just the texture IS important. Must be in scale and as heterogeneous as possible:

Using a bush, I applied the mix to my taste to the wheels and the lower part of the tank. As can be seen in the pictures, the result is anything but nice! But keep the faith! This is just the beginning!:

Once the texture paint is dry (a day or more, do not be impatient), using a colour mix of paints similar to the AK´s dust used previously, I randomly applied a fine coat of dust over the wheels. Be sure that this paint don´t hide all the elements or you´ll achieve a dull and unattractive surface. As usually, do it as heterogeneous as possible:

Remember that this paint can´t be removed, so be carefully when applying the paint with your airbrush:


And, why not, let´s start with the tracks. Use ALWAYS the same colours for dust in all the parts of the vehicle. Of course you can play a little bit with the mix proportions, but do not use different colours to simulate the same effect: dust and dirt:

Now, the final steps for the mud are a mix of techniques and products that I´ll try to resume at my best:

- Using oils: Naples Yellow, Natural Umber and Black, I made 3 mixes of these colours (like I did with acrylics) and using them as a wash, I applied them randomly on the different wheels with different intensities.

- For splashes, I used acrylic paints slightly diluted projected to the wheels with the help of an old airbrush

- Just in the tracks (where the two previous steps were also applied), I added punctually some pigments (a mix of three colours from Iraqi Sand and Russian earth ) to achieve some textures here and there. Remember that if you use a lot of pigments, you´ll spoil all the previous work as the surfaces where the pigments are used, if you´re not careful, will get dull, bored and will hide all the previous work!:


And then ..... finally, at last .... miracle!!! ........... just painting the tools, towing cables ... et voilá!

Many thanks for your attention!


The "Ambushing Panther" work: Dragon 1/35.

$
0
0
This is a Panther  Ausf. G early production, a nice kit from Dragon. Assembled almost from the box, I only added the metallic towing wires (and the field camouflage). I applied a soft modulation on the base paint, a medium weathering and a lot of splashes. The idea was to place it in a diorama next to a wet road with other vehicles passing by. A project too huge for such a lazy modeller...
Maybe someday.

Diego Quijano.


The Mig-21 chronicle (6).

$
0
0
Ok, the painting&weathering process is almost finished. Only some weathering in the green areas is needed to fade and stain them.
Now a summer break to make other things... a winter tank maybe.  :)

Q


The T-34 project (1/48).

$
0
0
Some pictures of the early composition. Still a lot of elements to add:


Everything is painted with acrylics. The grey blocks got some acrylic washes with brown and grey (Chipping color and Russian 4BO shadow from AK):

Time for some extra bricks for adding complexity to the debris. The thing begin to look better:

Q

The T-34 project (II)

$
0
0
I have decided to paint the tank before completing the base. The 4BO Russian green is painted with the modulation set by AK. I didn´t need a full modulation this time so I only used three shades of the set to get a cenithal effect.

The remains of white paint is made with the hairspray technique. After the chipping with dark brown is time for a black wash to enhance the panel lines and raised elements.

Q

The T-34 project (III)

$
0
0
The work in the tank is almost finished. There is only some local effects to add like some black stain in the exhaust zone and some darker streaks here and there. It´s time to finish the base:


Weathering some elements of the base. These bigger elements need special attention:


GUEST GALLERY: "Rust & Bones" 1/35 by RICK LAWLER

$
0
0
Rick is one of those few modelers that need no introduction, but what you maybe didn´t know is that he is perfectly capable of making one of his masterpieces not only with tanks and figures but also with flying machines. As usual Rick uses a high level of inspiration to create his works: 

One evening while surfing the web I stumbled upon a gallery of photos showing abandoned Russian helicopters; parked and left to the elements in what appears to be inner-city parking lots.  The thought of all of that high-tech hardware simply "put out to pasture" is quite mind-boggling if you think about it.  Cold war weapons reduced to discarded carcasses of aluminum and fading paint.  And there is the key, the faded paint!!  The colors and patina exhibited on these forgotten beasts is amazing – yes, in my case irresistible.

In my opinion, this is one of the best weathered models I´ve  ever seen, no doubt. And you?

If you want to see the step by step article along with the rest of Rick´s masterpieces please don´t miss his site: 
Rick Lawler´s Propaganda

Q


The T-34 project (IV)

$
0
0
Ok, the thing is 99% finished. It looks quite weird but you already knew that. Didn´t you?


Viewing all 69 articles
Browse latest View live